Newborn photography is one of the most delicate and emotionally meaningful areas of professional image creation, where every detail matters and every image tells a deeply personal story. While lighting, posing, and composition play a critical role in capturing beautiful newborn portraits, the final quality often depends on how carefully the skin is edited during post-production. Newborn skin is naturally soft and sensitive, yet it often presents temporary imperfections such as redness, blotchiness, flaky patches, or uneven tones that can distract from the overall image if not handled correctly.
Editing newborn skin is not about perfection in the traditional sense, but about refinement that preserves authenticity while enhancing visual appeal. Studio managers, studio owners, eCommerce sellers, and professional photographers all understand that clean, natural-looking images build trust, elevate brand perception, and improve client satisfaction. The goal is not to alter the baby’s identity, but to present the subject in the most flattering and realistic way possible.
Using Adobe Photoshop, professionals can apply precise and controlled techniques to gently refine newborn skin while maintaining texture and softness. This guide walks through a complete, step-by-step workflow designed to help you achieve consistent, high-quality results without over-editing or losing realism.
How To Retouch Newborn Skin In Photoshop
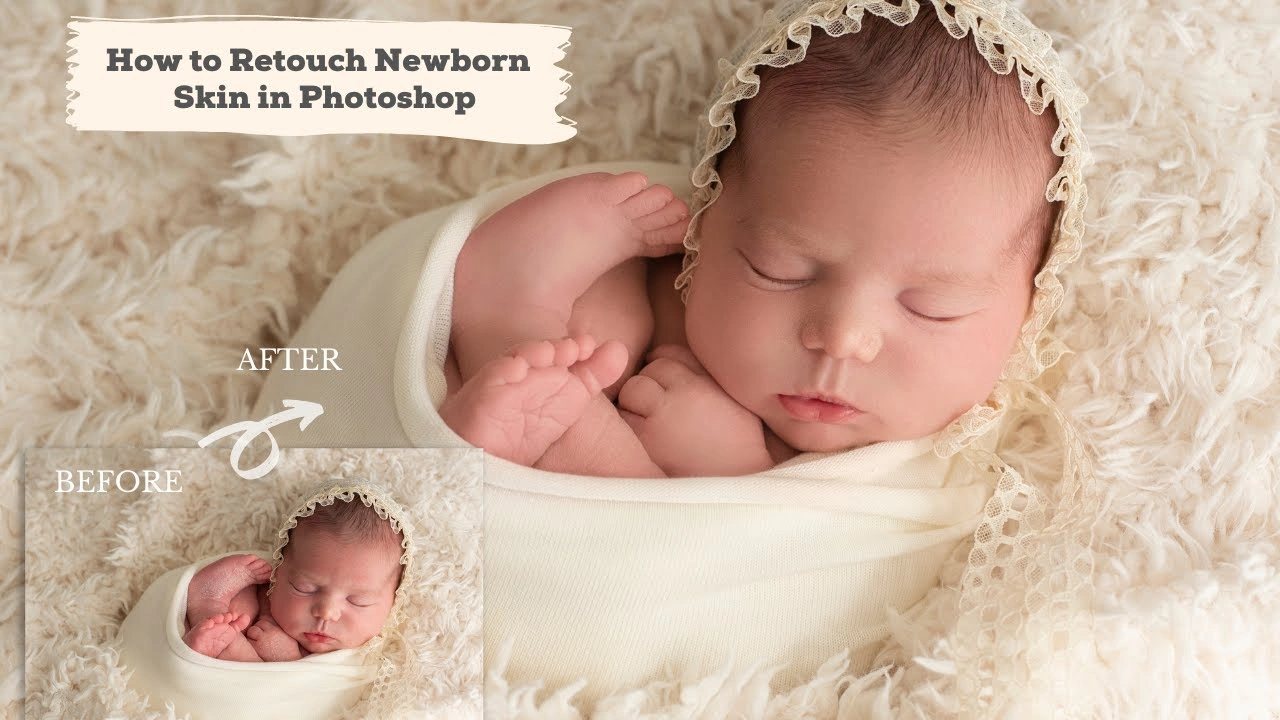
Retouching newborn skin in Adobe Photoshop requires a gentle and natural approach to maintain the baby’s soft texture while removing temporary imperfections. Start by adjusting exposure and white balance in the RAW file to ensure accurate skin tones. Once the image is ready, use the Spot Healing Brush Tool to remove minor blemishes, flakes, or redness without affecting surrounding areas.
For smoother results, apply a subtle skin smoothing technique by duplicating the layer, adding a light blur, and masking key details like eyes and lips. For professional results, use frequency separation to work on skin tone and texture separately, allowing you to even out blotchy areas while preserving natural detail.
Next, reduce redness using Hue/Saturation adjustments and refine tones with gentle dodge and burn. Finally, apply selective sharpening to important features. Keep edits minimal to ensure a soft, realistic newborn portrait.
Why Newborn Skin Retouching Needs Special Care
Newborn skin differs significantly from adult skin, both visually and structurally, which makes retouching a more nuanced process. Babies often have naturally uneven tones, temporary blemishes, and delicate textures that should not be erased entirely, as they contribute to authenticity and realism.
Over-editing is one of the most common mistakes in newborn retouching, where excessive smoothing leads to plastic-like skin that looks artificial and lifeless. This not only reduces the emotional impact of the image but also diminishes professional credibility, especially for studios and brands that rely on trust and visual consistency.
Maintaining natural texture is essential because it preserves the softness and detail that define newborn photography editing services. Gentle transitions, subtle tonal adjustments, and careful blending ensure that the final image looks polished without appearing manipulated. For professionals managing high client expectations or large volumes of images, striking this balance is critical to maintaining both quality and efficiency.
Essential Tools in Photoshop for Newborn Editing

Before diving into the workflow, it is important to understand the key tools that make newborn skin editing effective and controlled.
- Spot Healing Brush Tool: Ideal for removing small blemishes, flakes, or scratches without affecting surrounding areas.
- Clone Stamp Tool: Useful for more precise corrections, especially when matching texture manually at low opacity.
- Frequency Separation: A powerful technique that separates texture and color, allowing independent control over each element.
- Dodge & Burn: Helps balance light and shadow to create smooth tonal transitions and natural depth.
- Adjustment Layers: Essential for non-destructive color correction and tonal refinement.
Mastering these tools allows editors to work efficiently while maintaining full control over the final outcome.
Step-by-Step Editing Process
Image Preparation
The editing process begins with proper image preparation, which sets the foundation for all subsequent adjustments. Start by opening the RAW file and correcting white balance to ensure accurate skin tones. Adjust exposure, highlights, and shadows carefully to bring out details without overexposing delicate areas.
A well-balanced base image reduces the need for heavy retouching later and ensures that skin tones remain consistent throughout the editing process.
Cleaning Imperfections
Once the base image is ready, begin by removing temporary imperfections such as dry skin, scratches, or minor blemishes. Use the Spot Healing Brush Tool for quick corrections and switch to the Clone Stamp Tool for more complex areas where texture needs to be preserved.
Work at a moderate zoom level and avoid excessive corrections, as removing too much detail can make the skin appear unnatural. The objective is refinement, not perfection.
Skin Smoothing Techniques
Skin smoothing should always be approached with subtlety and restraint. Instead of applying heavy blur effects, use controlled methods that retain texture.
A common approach involves duplicating the image layer, applying a light Gaussian Blur, and masking out key features such as eyes, lips, and hair. Reducing the opacity of the blurred layer ensures that the smoothing effect remains gentle and realistic.
Frequency Separation Workflow
Frequency separation is one of the most effective techniques for newborn skin editing because it allows independent control of color and texture.
- The low-frequency layer handles color and tone
- The high-frequency layer preserves fine details and texture
By working on the low-frequency layer, you can smooth uneven tones without affecting skin texture. This technique is particularly useful for correcting blotchiness and redness while maintaining a natural look.
Color Correction and Tone Balancing
Newborn skin often contains red, yellow, or magenta tones that need careful balancing. Using adjustment layers such as Hue/Saturation and Selective Color, you can target specific color ranges and reduce unwanted tones.
The key is subtlety, as over-correction can result in dull or unrealistic skin. Maintaining warmth while reducing harsh color variations ensures a soft and pleasing appearance.
Soft Dodge & Burn for Depth
Dodge and burn techniques help refine tonal transitions and create a more polished look without relying on heavy smoothing.
- Use a low-opacity brush to gently lighten dark areas (dodge)
- Slightly darken overly bright areas (burn)
This method enhances depth and dimension, making the skin appear smooth yet natural.
Final Sharpening and Finishing
The final stage involves selective sharpening to enhance important details such as the eyes, eyelashes, and lips. Avoid sharpening the skin, as this can reintroduce imperfections or create unwanted texture.
At this stage, review the image at different zoom levels to ensure consistency and realism. A well-edited newborn image should look natural both up close and at full view.
Advanced Techniques for Professionals
Maintaining Skin Texture
Professional editors prioritize texture preservation by combining multiple techniques rather than relying on a single method. Using frequency separation alongside subtle dodge and burn allows for precise control without compromising detail.
Subtle Color Grading
Color grading can enhance mood and consistency across a series of images. Soft, warm tones are commonly used in newborn photography to create a comforting and timeless feel.
Consistency is especially important for studio owners and eCommerce sellers who need cohesive visual branding across galleries or product listings.
Non-Destructive Workflow Tips
Working non-destructively ensures flexibility and efficiency, especially when handling large volumes of images.
- Use adjustment layers instead of direct edits
- Apply layer masks for precise control
- Organize layers clearly for easy revisions
This approach allows editors to revisit and refine images without starting from scratch.
Common Mistakes to Avoid
Even experienced editors can fall into common traps when working with newborn images.
- Over-smoothing skin, which removes natural texture and creates an artificial appearance
- Ignoring tonal balance, leading to uneven or unrealistic skin tones
- Over-sharpening, which emphasizes imperfections rather than enhancing detail
- Inconsistent editing style, especially across multiple images in a session
Avoiding these mistakes ensures that the final images remain professional, natural, and visually appealing.
Best Practices for Studio & eCommerce Use with Lightroom
For studio managers, owners, and eCommerce sellers, consistency and efficiency are just as important as quality.
Consistency in Editing
Maintaining a consistent editing style across all images strengthens brand identity and builds trust with clients. Establishing a standard workflow ensures that every image meets the same quality benchmark.
Batch Workflow Tips
When handling large volumes of images, efficiency becomes critical.
- Use presets for initial adjustments
- Apply synchronized edits where possible
- Streamline repetitive tasks without compromising quality
Batch processing saves time while maintaining uniformity across projects.
Managing Client Expectations
Clear communication with clients regarding editing style and level of retouching helps avoid misunderstandings. Some clients prefer a more natural look, while others may request additional refinement.
Delivering results that align with client expectations enhances satisfaction and strengthens long-term relationships.
Conclusion
Editing newborn skin in Photoshop is both a technical process and an artistic skill that requires patience, precision, and a deep understanding of natural aesthetics. By focusing on subtle enhancements rather than dramatic transformations, professionals can create images that are both visually appealing and emotionally authentic.
From careful image preparation to advanced techniques like frequency separation and dodge and burn, each step plays a crucial role in achieving high-quality results. Avoiding common mistakes and maintaining a consistent workflow ensures that every image meets professional standards.
For studios and businesses aiming to scale their operations while maintaining quality, partnering with experienced editing teams such as Cutout Partner can provide a reliable solution. As a top leading photo editing agency, they support professionals in delivering polished, consistent, and natural-looking images that meet industry demands.
Ultimately, the goal of newborn skin editing is not perfection, but authenticity enhanced through thoughtful and skilled retouching.