In today’s visually driven world, high-quality images play a crucial role in shaping brand identity, influencing purchasing decisions, and capturing audience attention. Whether it’s fashion photography, portrait sessions, or eCommerce product visuals, the demand for flawless yet natural-looking images continues to grow. This is where professional retouching becomes essential, and at Cutout Partner, a leading photo retouching agency, delivering clean, polished, and realistic results is at the core of everything we do.
Modern retouching is no longer just about removing imperfections; it is about enhancing images while preserving authenticity. Among the many advanced techniques available in Photoshop, frequency separation stands out as one of the most powerful and widely used methods. It allows retouchers to refine skin, correct tones, and remove blemishes without destroying the natural texture of the image.
This guide is designed to walk you through frequency separation in a practical and easy-to-understand way. Whether you are a beginner learning Photoshop or an intermediate user looking to refine your workflow, mastering this technique will significantly improve the quality and efficiency of your retouching process.
What is Frequency Separation?
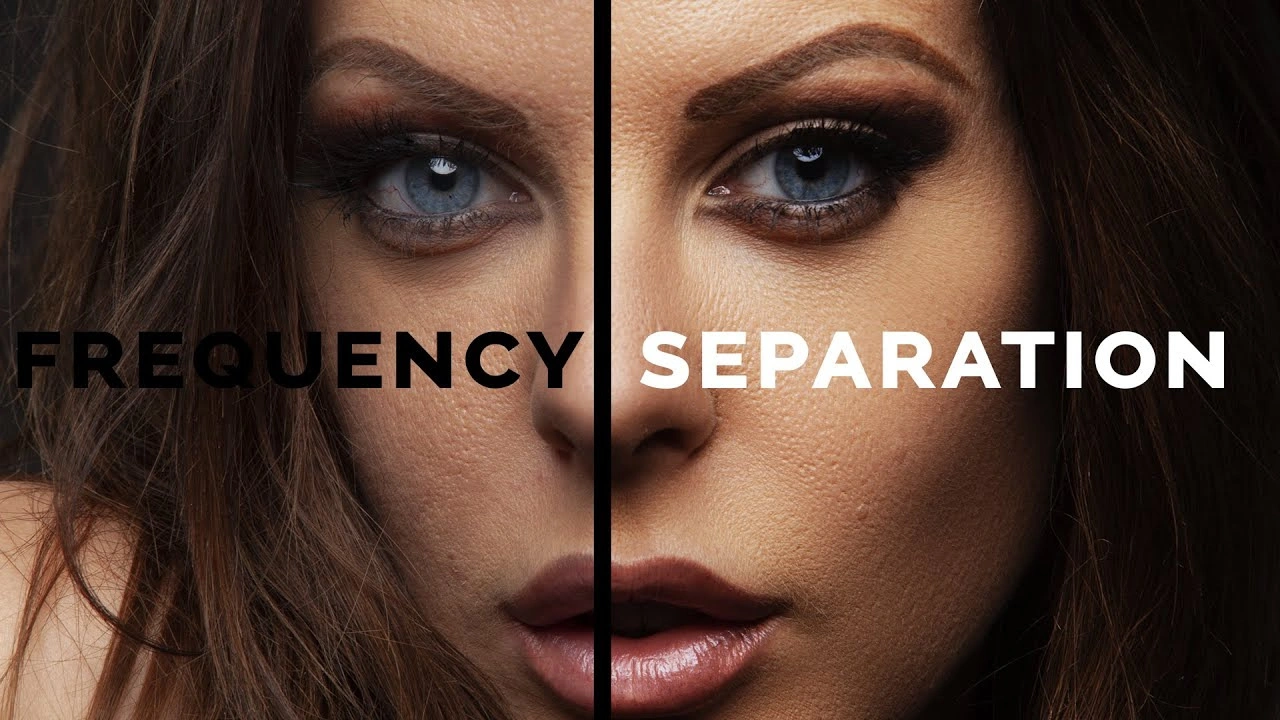
Frequency separation is a professional retouching technique in Photoshop that divides an image into two distinct layers: one containing texture and fine details, and the other containing color and tonal information. By separating these elements, you gain precise control over each aspect of the image without affecting the other.
In simple terms, the image is broken down into:
- High Frequency Layer – Contains details such as skin texture, pores, hair, and fine lines
- Low Frequency Layer – Contains color transitions, lighting variations, and tonal gradients
This separation allows you to edit color and texture independently. For example, you can smooth uneven skin tones on the low-frequency layer while preserving the natural texture on the high-frequency layer.
Traditional retouching methods often involve tools like the healing brush or clone stamp applied directly to the image. While effective, these methods can sometimes blur or damage texture. Frequency separation avoids this issue by isolating texture from tone, ensuring that edits remain clean, controlled, and non-destructive.
Why Frequency Separation Matters with AI

Frequency separation has become a staple in professional retouching workflows because of the control and precision it offers. Its importance lies in the ability to enhance images without compromising realism.
One of the biggest advantages is the preservation of natural skin texture. Over-smoothing skin is a common mistake that results in an artificial or plastic appearance. With frequency separation, you can correct imperfections while maintaining the integrity of pores, fine lines, and natural variations.
Another key benefit is improved color correction. Uneven skin tones, shadows, and highlights can be balanced independently of texture, leading to more consistent and visually pleasing results.
Additionally, frequency separation contributes to a more professional finish. Images edited using this technique tend to look cleaner and more refined, which is especially important in commercial photography where quality directly impacts perception.
Finally, it helps avoid over-editing. Because you are working on separated layers, you can make precise adjustments without affecting the entire image, reducing the risk of introducing unwanted artifacts or losing detail.
High Frequency vs Low Frequency
Understanding the difference between high and low frequency layers is fundamental to mastering this technique.
The high-frequency layer focuses on the fine details of the image. This includes skin texture, pores, hair strands, fabric patterns, and other small elements that define sharpness and realism. Edits on this layer are typically used to remove minor imperfections while preserving detail.
The low-frequency layer, on the other hand, contains the broader visual information such as color, tone, lighting gradients, and shadows. This layer is where you address uneven skin tones, blotchiness, and lighting inconsistencies.
By separating these two components, you can independently adjust tone and texture. This ensures that when you smooth out skin tones, you are not accidentally blurring the details that make the image look natural.
In professional workflows, both layers are treated carefully to maintain a balance between smoothness and realism, resulting in a polished yet authentic final image.
Step-by-Step Guide to Frequency Separation
To effectively use frequency separation, it is important to follow a structured workflow. Below is a beginner-friendly step-by-step process.
1. Preparing the Image
Start by opening your image in Photoshop. Working with RAW files is recommended because they retain more detail and allow greater flexibility during editing. If you are using JPEG, ensure the image is high resolution.
2. Duplicate the Layers
Create two duplicates of your original image layer. Rename one layer as “Low Frequency” and the other as “High Frequency.” This helps keep your workflow organized.
3. Apply Gaussian Blur
Select the low-frequency layer and apply a Gaussian Blur. The goal is to blur the image just enough so that skin texture disappears, leaving only color and tonal information visible. The exact radius will depend on the image resolution, but it should be adjusted carefully to avoid losing too much detail.
4. Subtract the Low Frequency from the High Frequency
Select the high-frequency layer and use the “Apply Image” function. This process removes the color information, leaving only texture. You will need to set the blending mode to Linear Light to correctly combine the layers.
5. Set Up the Layers
Once both layers are prepared, the high-frequency layer should sit above the low-frequency layer. Together, they recreate the original image when combined.
6. Begin Retouching
Now you can edit each layer independently. Use tools like the brush tool on the low-frequency layer to adjust tones, and tools like the clone stamp or healing brush on the high-frequency layer to refine texture.
Tools & Techniques Used
Several Photoshop tools are commonly used in conjunction with frequency separation.
The Brush Tool is often used on the low-frequency layer to blend colors and smooth out tonal inconsistencies. By sampling nearby colors, you can paint over uneven areas while maintaining a natural look.
The Clone Stamp Tool is ideal for working on the high-frequency layer. It allows you to sample textures from one area and apply them to another, making it useful for removing blemishes without altering tone.
Healing tools, such as the Healing Brush and Spot Healing Brush, can also be used to correct imperfections. These tools automatically blend texture and color, but they are best used carefully to avoid over-editing.
The Gaussian Blur filter plays a key role in creating the low-frequency layer. It helps isolate color information by removing fine details.
Each of these tools contributes to a controlled and efficient retouching process when used correctly within a frequency separation workflow.
Removing Blemishes
One of the most common applications of frequency separation is blemish removal. This includes pimples, wrinkles, stray hairs, and other minor imperfections.
When removing blemishes, it is important to work on the high-frequency layer to preserve texture. By using the clone stamp or healing tools, you can replace unwanted details with clean texture sampled from nearby areas.
Care must be taken to avoid repetitive patterns or unnatural blending. The goal is not to erase all imperfections but to reduce distractions while maintaining a realistic appearance.
Subtlety is key in this process. Over-editing can lead to a loss of character and realism, which is often noticeable in high-resolution images.
Smoothing Skin in Photoshop
Skin smoothing is typically performed on the low-frequency layer. This involves adjusting color transitions, shadows, and highlights to create a more even complexion.
Using a soft brush, you can sample nearby tones and gently paint over areas with uneven coloration. This helps reduce redness, blotchiness, and harsh shadows.
It is important to maintain natural gradients while smoothing. Abrupt transitions can make the image look artificial, so gradual blending is essential.
The combination of tone correction on the low-frequency layer and texture preservation on the high-frequency layer results in smooth yet realistic skin.
Professional Skin Retouching Workflow
Frequency separation is often used as part of a broader retouching workflow that includes additional techniques.
Dodging and burning is commonly applied to enhance light and shadow. This technique helps sculpt the face and add depth by selectively brightening and darkening areas.
Color correction ensures that the overall color balance of the image remains consistent and visually appealing. This step is particularly important in maintaining accurate skin tones.
Sharpening is applied at the final stage to enhance detail and clarity. Care must be taken not to over-sharpen, as this can introduce noise or artifacts.
By combining these techniques with frequency separation, professionals achieve high-end results that meet commercial standards.
Small Scale vs Large Scale Retouching
Retouching can be divided into small scale and large scale adjustments, both of which play important roles.
Small scale retouching focuses on fine details such as pores, blemishes, and hair strands. These are typically addressed on the high-frequency layer.
Large scale retouching involves broader tonal adjustments, including lighting balance, color transitions, and overall composition. These are handled on the low-frequency layer.
Balancing both scales ensures that the image looks refined at both close inspection and from a distance. This dual approach is essential for producing images suitable for print, advertising, and digital media.
RAW vs JPEG Workflow
The type of file you work with can significantly impact your frequency separation workflow.
RAW files contain more image data and provide greater flexibility in adjusting exposure, white balance, and color before applying retouching techniques. This makes them ideal for professional editing.
JPEG files, while more compressed, can still be used effectively, but they offer less room for correction. Adjustments may introduce artifacts if pushed too far.
Working with RAW images allows you to achieve cleaner results and maintain higher image quality throughout the retouching process.
Manual Frequency Separation vs Photoshop Actions
Frequency separation can be created manually, as outlined in the step-by-step process. This method gives you full control and helps you understand how the technique works at a deeper level.
However, many professionals use Photoshop actions to automate the process. Actions can quickly set up the necessary layers, blending modes, and settings, saving valuable time during repetitive tasks.
Using actions is particularly beneficial in high-volume workflows, such as eCommerce retouching, where efficiency is essential.
Both methods are valuable, and mastering the manual process first provides a strong foundation before relying on automation tools.
Practical Tips and Best Practices
Achieving natural-looking results requires attention to detail and restraint. One of the most important principles is to avoid over-editing. The goal is to enhance, not to completely alter, the original image.
Working at different zoom levels helps ensure consistency. Zoom in to handle fine details and zoom out to evaluate the overall balance of the image.
Sampling nearby colors and textures is key to maintaining realism. Avoid introducing elements that do not naturally belong in the image.
Another important tip is to use a light touch when applying adjustments. Subtle changes often produce the most professional results.
Finally, always review your work before finalizing. Comparing the edited image with the original helps identify areas that may need refinement.
Conclusion
Frequency separation is one of the most powerful and essential techniques in modern Photoshop retouching. By separating texture from color and tone, it provides unparalleled control over image editing while preserving the natural integrity of the subject.
From removing blemishes and smoothing skin to performing advanced tonal corrections, this technique enables photographers and retouchers to achieve professional-grade results with precision and consistency.
At Cutout Partner, mastering such techniques is part of delivering high-quality retouching services that meet the demands of today’s visual industry. Whether you are working on portraits, fashion images, or commercial photography, frequency separation can significantly elevate the standard of your work.
With practice, patience, and a clear understanding of the workflow, you can incorporate this technique into your editing process and produce images that stand out with clarity, realism, and professional polish.
Need flawless photography editing with the highest quality standards? Save your valuable time and money by partnering with Cutout Partner, your trusted expert in professional eCommerce photo retouching. From precise retouching to consistent, high-end image enhancement, we deliver results that elevate your visuals and help your products stand out. Contact Cutout Partner today and experience editing that combines quality, efficiency, and reliability.
Frequently Asked Questions (FAQ) on Frequency Separation in Photoshop
What is frequency separation in Photoshop?
Frequency separation is a retouching technique that splits an image into two layers: one for texture (high frequency) and one for color and tone (low frequency). This allows editors to adjust skin texture and color independently without affecting overall image quality.
Why is frequency separation used in photo retouching?
It is used to achieve professional, natural-looking results while preserving fine details. Retouchers can smooth skin tones, fix imperfections, and maintain realistic textures, avoiding the overly “plastic” look that often comes from basic smoothing tools.
Is frequency separation suitable for beginners?
Yes, beginners can learn frequency separation with practice. While the concept may seem technical at first, following a step-by-step workflow makes it easier to understand and apply effectively.
What kind of images work best with frequency separation?
Frequency separation works best with high-resolution images, especially portraits, beauty shots, and fashion photography. RAW files are preferred because they retain more detail and allow greater flexibility during editing.
What is the difference between high frequency and low frequency layers?
The high-frequency layer contains fine details such as skin texture, pores, hair, and small imperfections. The low-frequency layer contains color, lighting, shadows, and overall tonal information. Each layer is edited separately.
Can frequency separation remove blemishes?
Yes, blemishes such as pimples, minor wrinkles, and stray hairs can be removed using the high-frequency layer. Tools like the clone stamp or healing brush are typically used to clean up texture while preserving natural detail.
How do you smooth skin using frequency separation?
Skin smoothing is done on the low-frequency layer by adjusting color and tonal variations. By blending uneven areas with a soft brush, you can create smoother transitions in highlights and shadows without affecting texture.
Do I need advanced Photoshop skills to use this technique?
Not necessarily. Basic knowledge of Photoshop tools such as layers, brushes, and filters is helpful. With guided practice, most users can learn and apply frequency separation effectively.
What tools are commonly used with frequency separation?
Common tools include the brush tool for color blending, the clone stamp tool for texture correction, healing tools for minor imperfections, and Gaussian blur for separating frequency layers.
Can frequency separation be overused?
Yes, overusing frequency separation can lead to unnatural results, such as overly smooth skin or loss of detail. Subtle adjustments are key to maintaining realism and professional quality.
Is frequency separation non-destructive?
When used properly with duplicated layers and smart workflows, frequency separation can be non-destructive. It allows you to make edits without permanently altering the original image.