In 2026, product photography workflow is the hidden engine behind every successful online shopping experience. As e-commerce keeps growing fast, brands depend on high-quality images to turn visitors into loyal customers.
This simple guide will take you through the full product photography process—from planning and shooting to editing, organizing files, and using the latest tools. You’ll learn easy, proven steps that top studios follow to create clean, consistent, and eye-catching images that boost sales.
Want to make your workflow faster and more efficient while keeping your brand style consistent? Explore these practical tips, real examples, and everything you need to succeed in product photography in 2026.
In 2026, product photography workflow is the hidden engine behind every successful online shopping experience. As e-commerce continues to grow, brands rely on high-quality images to turn visitors into loyal customers.
Want to make your workflow faster and more effective while keeping your brand style consistent? Explore these practical tips, real examples, and everything you need to succeed in product photography in 2026.
In this blog at Cutout Partner, a Top leading image editing agency, we discuss the full product photography process in a simple way. From planning and shooting to editing, file organization, and using modern tools, this guide covers everything step by step. You’ll learn easy and proven methods used by top studios to create clean, consistent, and attractive product images that help increase sales.
Understanding the Product Photography Workflow
A product photography workflow is more than just taking pictures. It is a clear, step-by-step process that takes your visuals from the first idea to the final delivery. Instead of working randomly, a structured workflow helps keep everything organized and easy to repeat.
With a proper system, each stage—from planning and shooting to editing and file management—runs smoothly. This helps maintain consistent quality, follow brand guidelines, and avoid costly mistakes.
For example, a solo creator may keep the process simple for speed, while a team can divide tasks and use checkpoints to stay on track. No matter the setup, a well-defined workflow is essential for creating reliable, high-quality product images.
Defining Product Photography Workflow
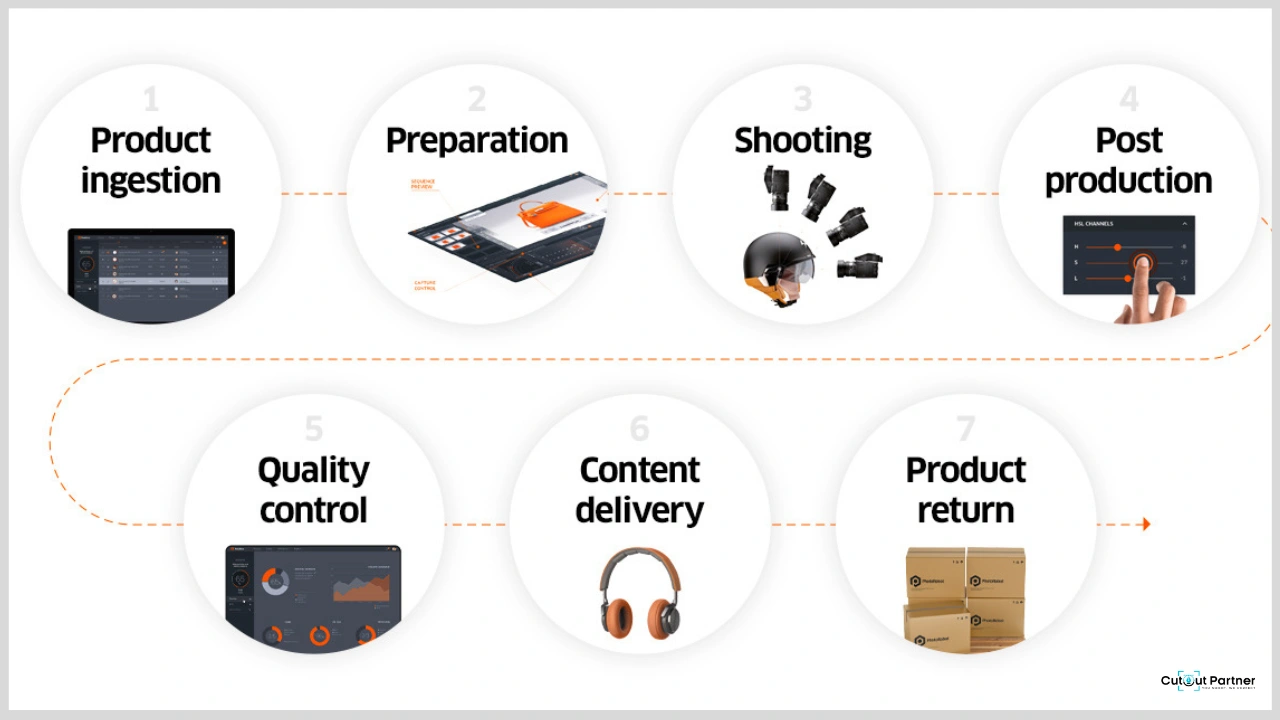
The product photography workflow has four main stages: pre-shoot planning, shooting, post-production, and final delivery or storage. Each stage includes clear and simple steps. For example, pre-shoot planning covers making shot lists and preparing products, while post-production focuses on editing and optimizing images.
These organized steps help avoid missed shots, rushed editing, or lost files. On the other hand, working without a clear process can lead to uneven results and wasted time.
Whether you work alone or with a team, adjusting the workflow to fit your needs makes the process smoother and ensures every image matches your brand style.
Core Stages of a Modern Workflow
A modern product photography workflow includes four main stages:
- Pre-shoot: Set clear goals, create shot lists, prepare products, gather equipment, and choose the right location.
- Shooting: Capture images based on the plan, focusing on good lighting and strong composition.
- Post-production: Edit, retouch, and adjust images to keep them clean, sharp, and consistent.
- Delivery and storage: Export files, organize them properly, back them up, and review with feedback if needed.
Workflows can change depending on the product. For example, jewelry photography often needs macro lenses and precise lighting, while clothing shoots require clean backgrounds and ghost mannequin effects.
Top e-commerce brands follow structured workflows to create images for websites, ads, and social media—making sure every platform gets high-quality, on-brand visuals.
Adobe Lightroom Workflow in Photography
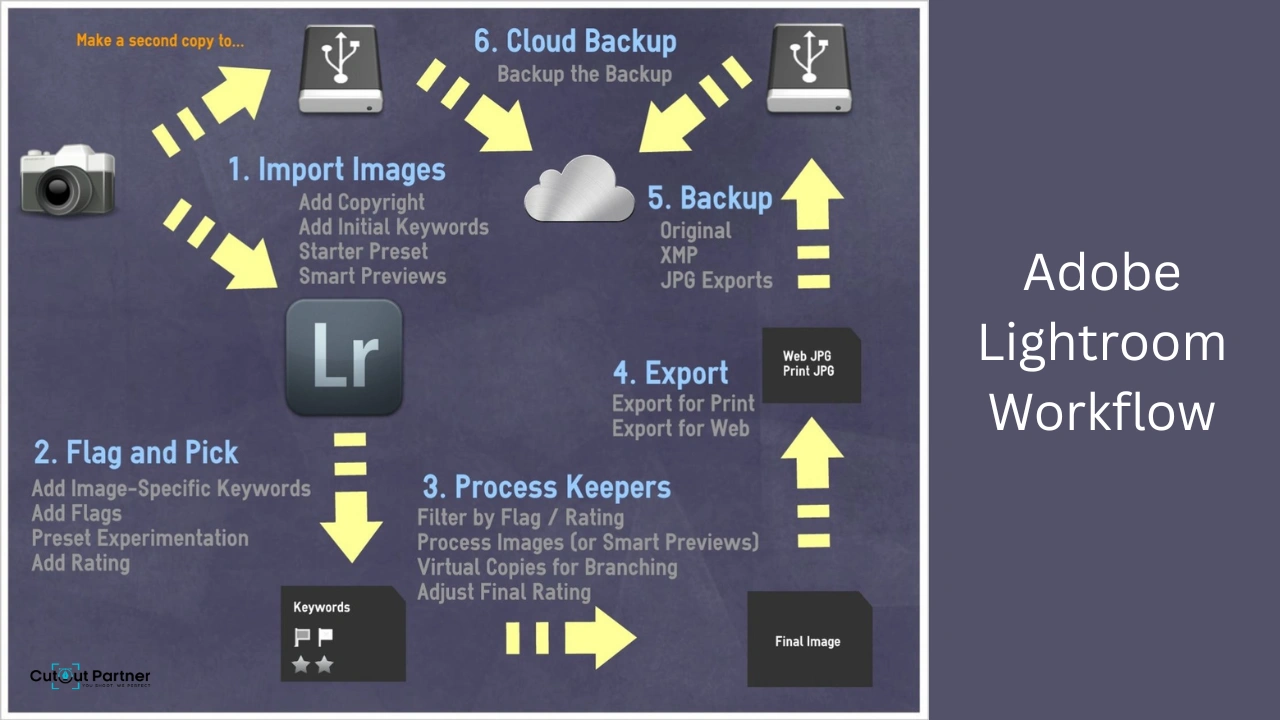
Adobe Lightroom workflow in photography is a structured process used to organize, edit, and enhance images efficiently. It begins with importing photos, where images are sorted and rated for selection. Next, photographers use Lightroom’s editing tools to adjust exposure, color balance, contrast, and sharpness while maintaining image quality. Non-destructive editing allows changes without altering the original file. The workflow also includes batch editing, preset application, and syncing adjustments across multiple images for consistency. Finally, images are exported in the required format and resolution for web, print, or client delivery, making Lightroom a powerful tool for professional and organized photo editing.
Why Workflow Matters in 2026
In 2026, the demand for content is growing fast as brands compete across e-commerce and social media. A smooth product photography workflow helps save time and handle more work easily, while keeping image quality consistent and building customer trust.
Studies show that 67% of shoppers think high-quality images are very important when making buying decisions. Brands with efficient workflows can launch products faster and stay ahead of competitors.
In the end, a strong product photography workflow is not just about working faster—it also supports creativity and helps brands achieve long-term success.
Emerging Trends Influencing Workflow
New trends are changing how product photography workflows operate. AI-powered tools now handle tasks like background removal and basic retouching, saving a lot of time and reducing manual work. Remote collaboration tools also help teams review and approve images from anywhere.
There is also a growing demand for 3D and AR-ready product images, as customers now expect more interactive shopping experiences. At the same time, automation in file organization and delivery is becoming common, making it easier to manage large numbers of images.
In 2026, more brands are investing in workflow automation to stay flexible and keep up with new tools and technologies, ensuring their product photography process stays modern and efficient.
Pre-Shoot Preparation: Setting Up for Success
Before you even take the first photo, the success of your product photography workflow depends on proper planning. Every step—like creating a shot list and preparing the products—helps make the shoot smooth and stress-free.
Good preparation builds a strong foundation for the entire process. When everything is ready in advance, it becomes easier to capture high-quality images without delays or mistakes.
Creating a Detailed Shot List
A shot list is a key part of a smooth product photography workflow. It helps you capture every important angle, product type, and variation without missing anything. Start by setting clear goals, such as whether the images are for product pages, ads, or social media.
To build a strong shot list:
- List all products and their variations
- Define the angles and compositions you need
- Note any props, backgrounds, or models required
- Follow brand guidelines and mood boards
This kind of planning makes your workflow faster and more organized. It also helps avoid missed shots and reduces the need for reshooting.
For example, many brands create different shot lists for each platform, which helps them produce content quickly and with fewer mistakes.
Checking and Preparing Full Setup Camera Equipment
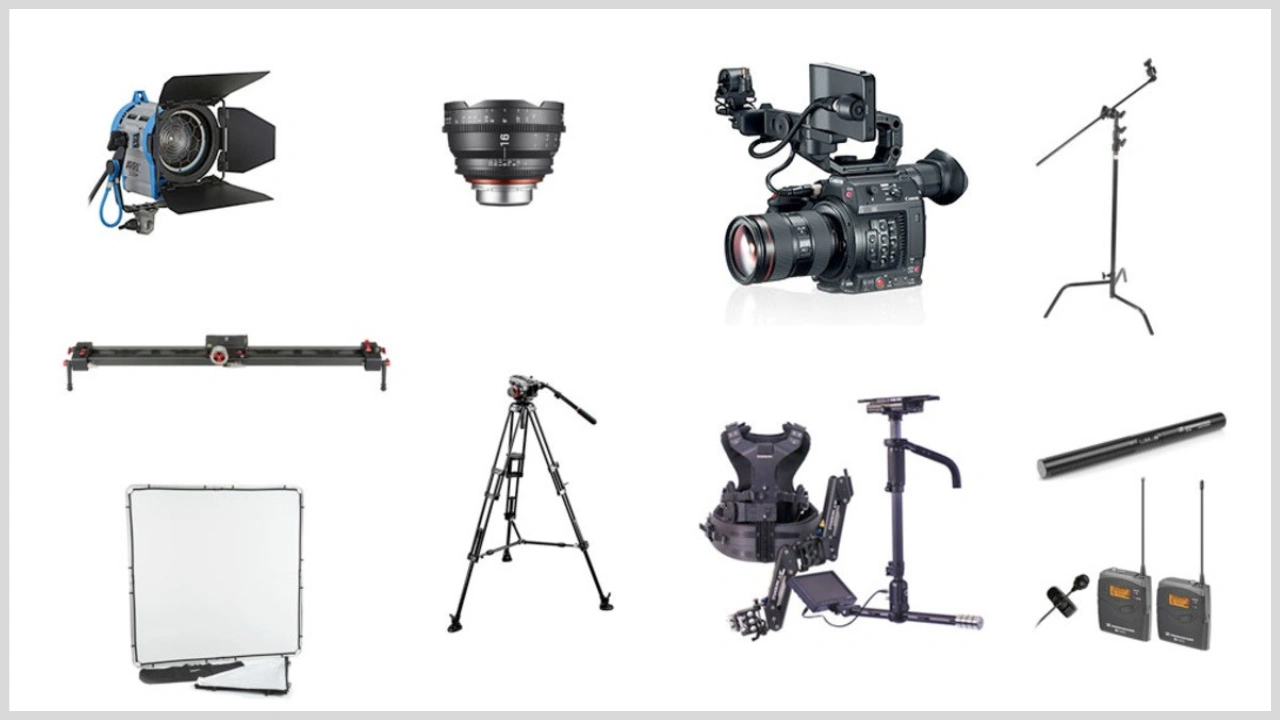
Getting your equipment ready is a must in any product photography workflow. Before the shoot, go through a simple checklist to avoid last-minute problems:
- Clean camera lenses and sensors
- Charge all batteries and carry extras
- Format memory cards
- Set up tripods, lights, and modifiers
- Collect props and styling tools
Always test your gear in advance, especially lighting and special lenses used for close-up or lifestyle shots. It’s also smart to have backups, like extra batteries or bulbs.
Equipment issues can slow down your work, so being fully prepared helps keep your product photography workflow smooth and on schedule.
Location Scouting and Set Design
Choosing the right location can take your product photography workflow from average to professional. First, decide whether the shoot will take place in a studio, outdoors, or at a specific location. Each option has its own advantages depending on the product and style.
Pay attention to lighting conditions, whether natural or artificial, and make sure the background is clean and free from distractions. A well-designed set helps keep the focus on the product and improves overall image quality.
Careful location planning ensures a smoother workflow and more consistent, visually appealing results.
Use mockups or digital planning tools to visualize your setup before the shoot. This helps you understand how the final scene will look and allows you to make adjustments in advance. For example, scheduling your shoot during morning natural light can improve both the mood and color accuracy of your images.
By scouting and planning ahead, you can avoid unexpected issues on set and reduce the time spent fixing problems later. This keeps your product photography workflow smooth, efficient, and well-organized.
Scheduling and Team Coordination with Photography
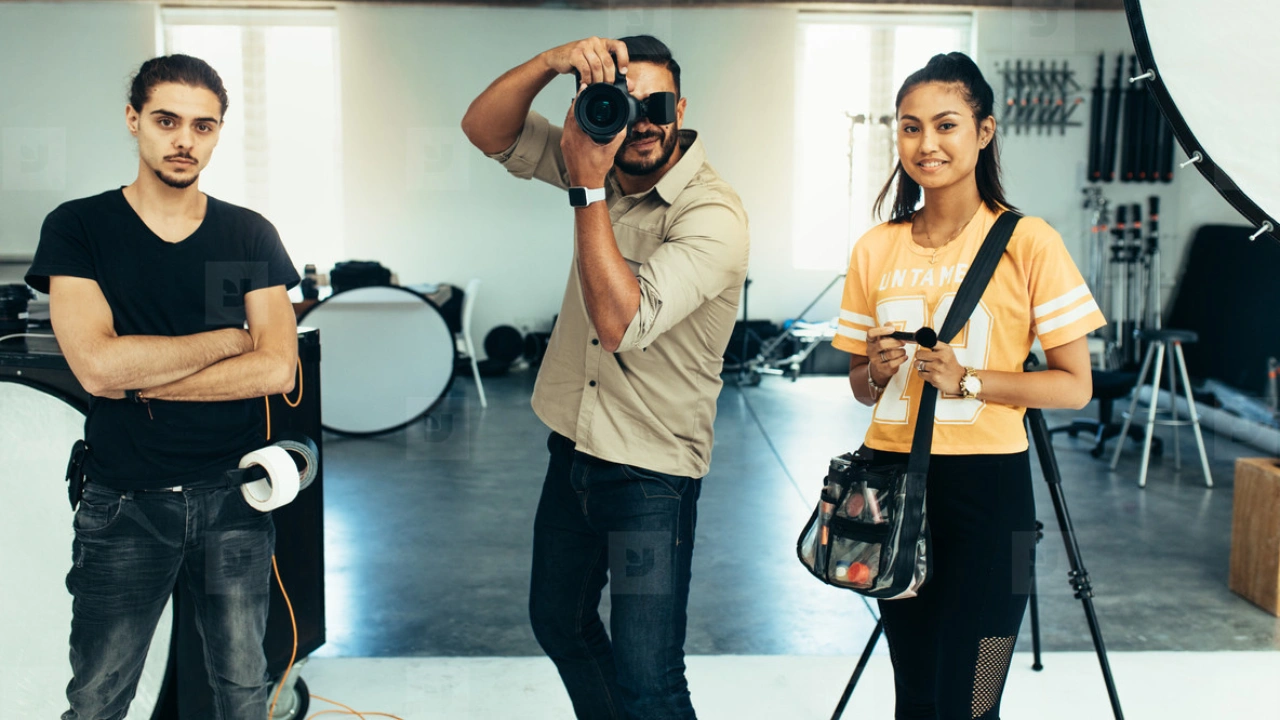
A smooth product photography workflow depends on clear roles and proper planning. Each team member should have defined responsibilities, such as photographer, stylist, assistant, and producer.
Use project management tools to organize schedules and share expectations early. For example, in a full-day model shoot, plan wardrobe changes and makeup sessions in advance to avoid delays.
When everyone understands their tasks and timing, the workflow becomes more organized. This helps reduce stress, improve teamwork, and keep the entire product photography process running efficiently.
Product Photography Preparation and Styling
The last step before the shoot is preparing and styling the products properly. This includes:
- Cleaning, steaming, and assembling each product
- Labeling SKUs for easy identification
- Arranging props and backdrops neatly
- Styling according to brand guidelines
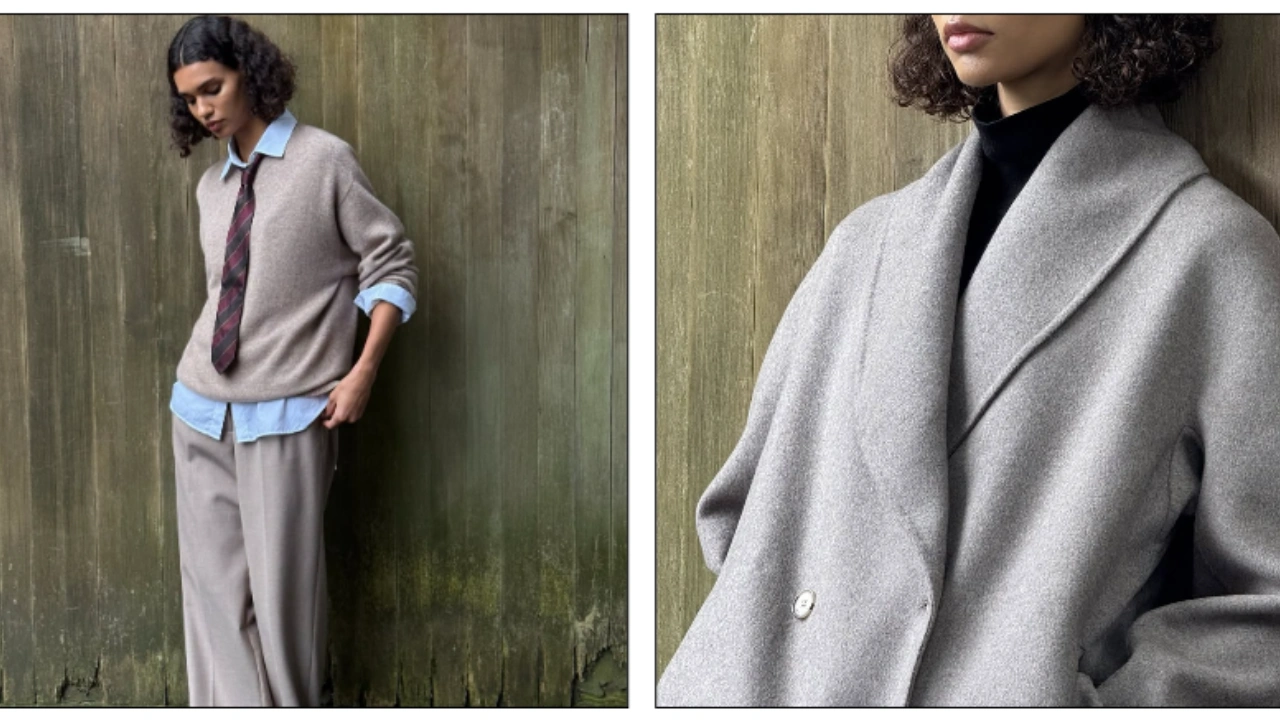
Paying attention to small details is very important in a product photography workflow. For example, beauty brands may prepare swatches and use hand models for variety, while fashion brands make sure every garment looks neat and perfect.
Good preparation reduces the need for heavy editing and helps ensure all images stay consistent with the brand style.
Capturing the Perfect Image: Shooting Best Practices
Capturing high-quality product photos requires both creativity and technical skill. Every step in the product photography workflow—from lighting to camera settings—affects the final result and can influence sales. Below are the key best practices used by professionals to create clean, consistent, and brand-focused images.
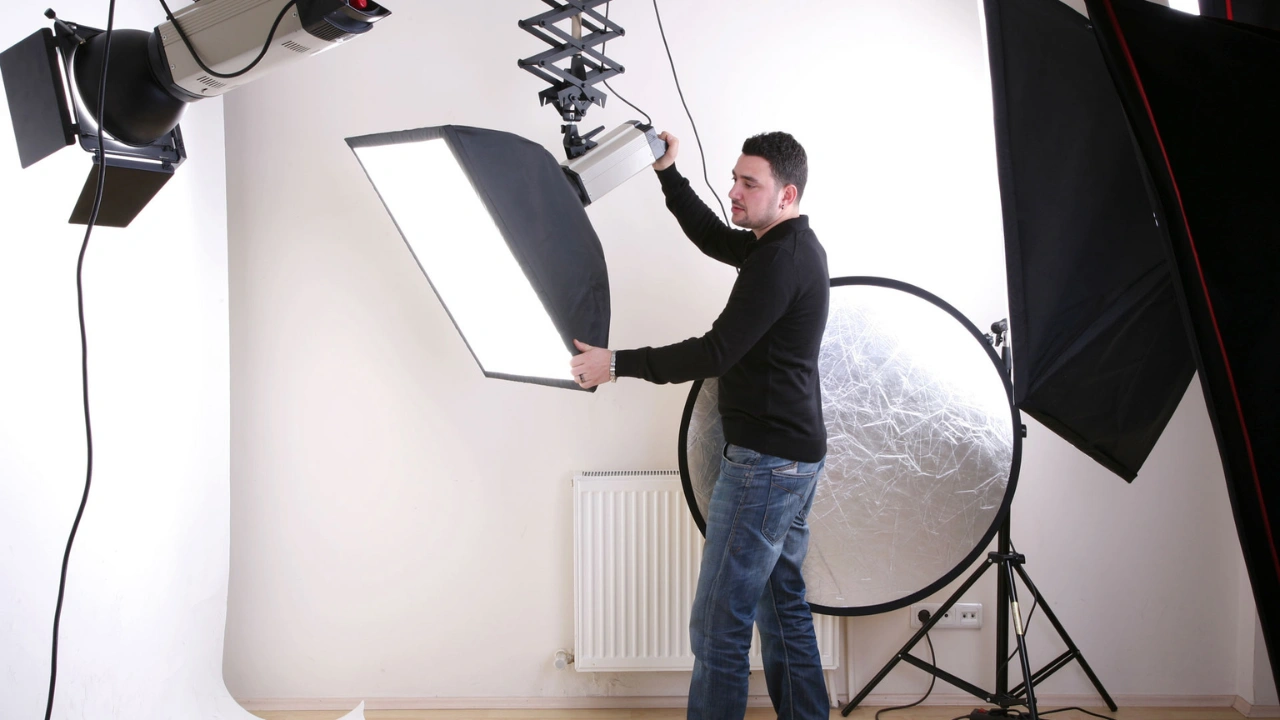
Mastering Lighting and Composition
Lighting is the most important part of any product photography workflow. Choose between natural light or artificial lighting depending on your product and brand style. Tools like softboxes, reflectors, and diffusers help control shadows and highlight details while keeping exposure consistent.
Composition is equally important. Techniques like the rule of thirds, negative space, and leading lines help draw attention to the product. Proper lighting reduces editing issues later, so investing time here improves the entire workflow.
Camera Settings and Shooting Techniques
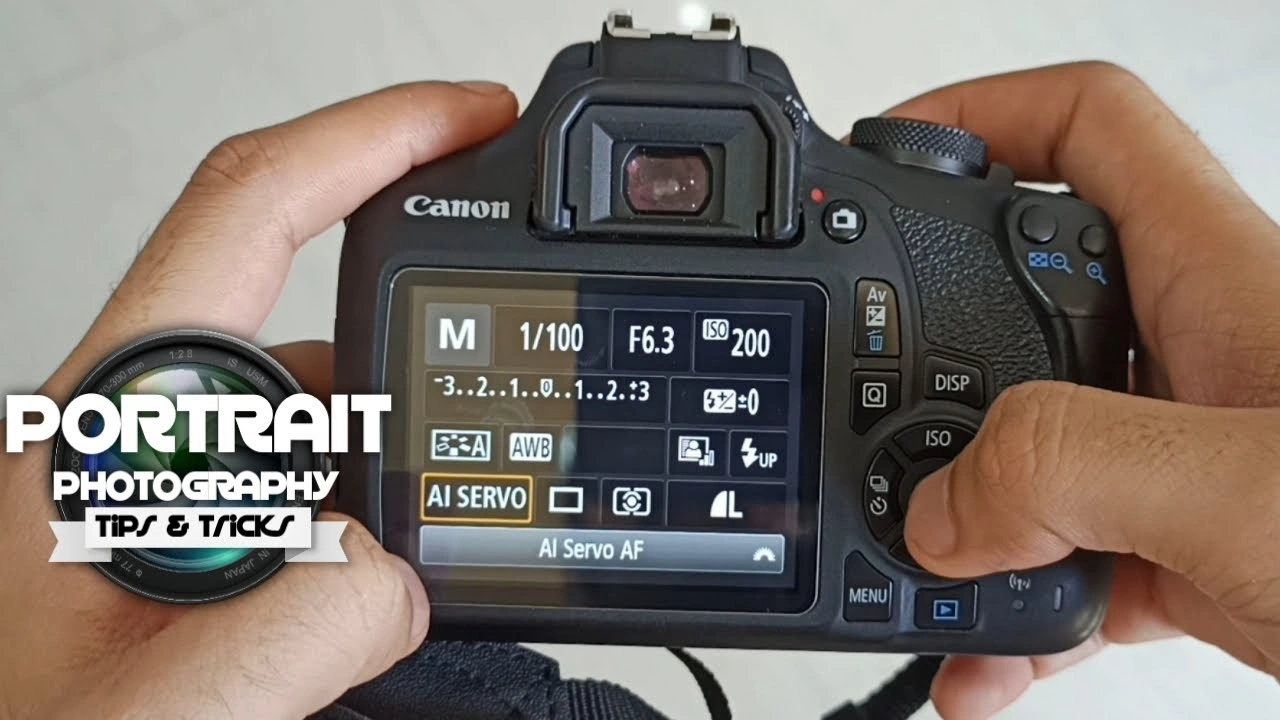
Using the right camera and lens setup is essential for smooth workflow execution. DSLR or mirrorless cameras with suitable lenses work best depending on the product type. Adjust key settings like ISO, aperture, and shutter speed according to the lighting and desired depth of field.
Shooting in RAW format helps preserve image detail for editing. Bracketing exposures can be useful for reflective or highly detailed products. Macro lenses are ideal for capturing fine details in items like jewelry or electronics.
Consistency Across Product Lines
Consistency plays a major role in a successful product photography workflow. Using tripods, fixed angles, and marked positions helps maintain uniformity across shoots. Keeping backgrounds, lighting setups, and props consistent ensures all images follow the same visual style.
Templates for similar product categories can also save time and improve uniformity. For example, apparel brands often use ghost mannequins to maintain a clean and consistent look. Consistent visuals build trust with customers and make your workflow more efficient across all platforms.
Styling and On-Set Adjustments
Styling is the stage where your product looks its best within the product photography workflow. Arrange each item carefully and always check for dust, fingerprints, or packaging defects before taking photos. Using tethered shooting allows you to view images on a larger screen in real time, making it easier to spot and fix issues quickly.
Make small adjustments to props, angles, or lighting whenever needed during the shoot. For example, food photographers may use simple techniques like glycerin to keep items looking fresh. Being flexible on set reduces extra work during editing later.
Capturing for Multi-Channel Use
Modern brands need product images for websites, social media, ads, and print, so it’s important to plan your product photography workflow for flexibility. Capture wide shots, medium shots, and close-up images so you have options for different platforms.
Also, consider different crop formats while shooting—square for Instagram, portrait for stories, and landscape for banners. This helps your images fit smoothly across all channels without extra effort.
Lifestyle shots add context and help tell a story, while catalog shots keep the focus clean and simple. By planning everything in one session, you save time, reduce the need for reshoots, and get the most value from your product photography workflow.
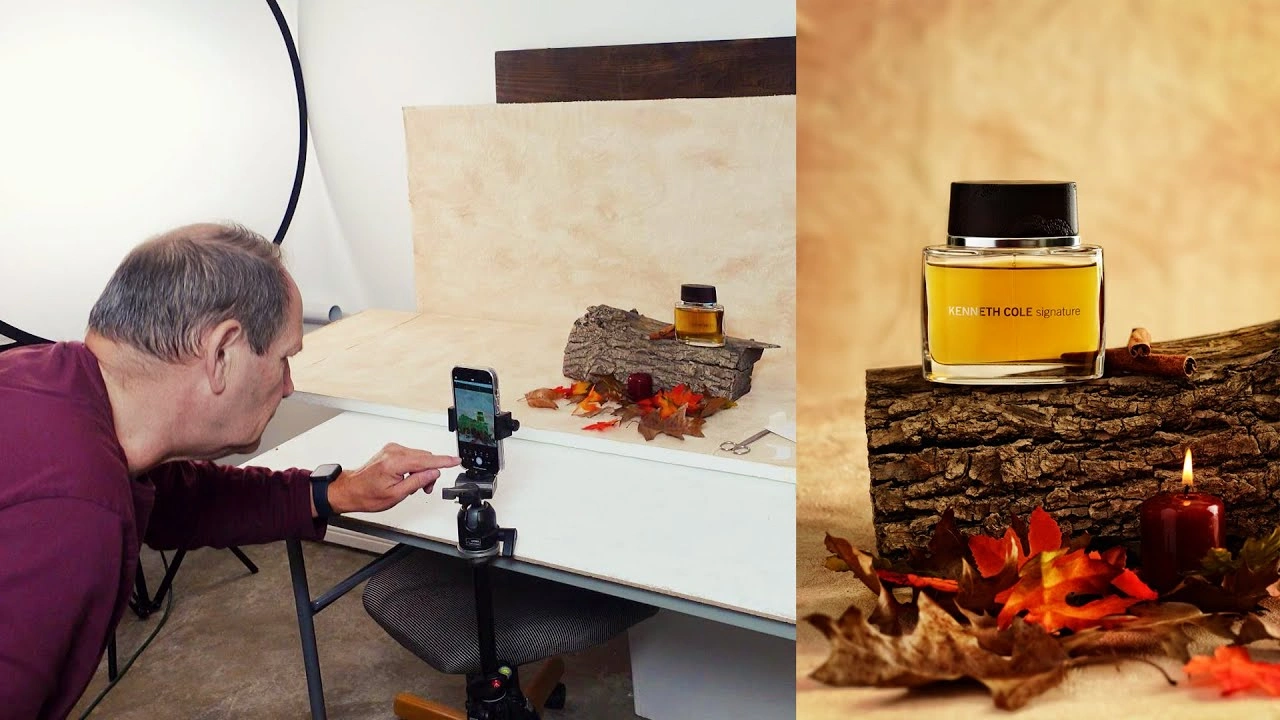
Post-Production: Editing, Retouching, and Optimization
Post-production is the stage where your product photography workflow truly comes together. Here, raw images are turned into clean, professional visuals ready for e-commerce, print, and marketing. A well-organized editing process helps speed up delivery, reduce mistakes, and ensure your brand looks consistent across all images.
Organizing and Selecting the Best Shots
The first step is to organize your images properly. Import all files into editing tools like Lightroom or Capture One and sort them using a clear folder structure based on product, date, or campaign.
Next, review and select the best images by focusing on sharpness, composition, and brand alignment. Use ratings, flags, or color labels to make sorting easier and to support team feedback.
- Import images into editing software
- Use ratings or labels for sorting
- Create separate folders for selected images
A clean selection process saves time and ensures only the best photos move forward in your product photography workflow.
Color Correction and Exposure Adjustments
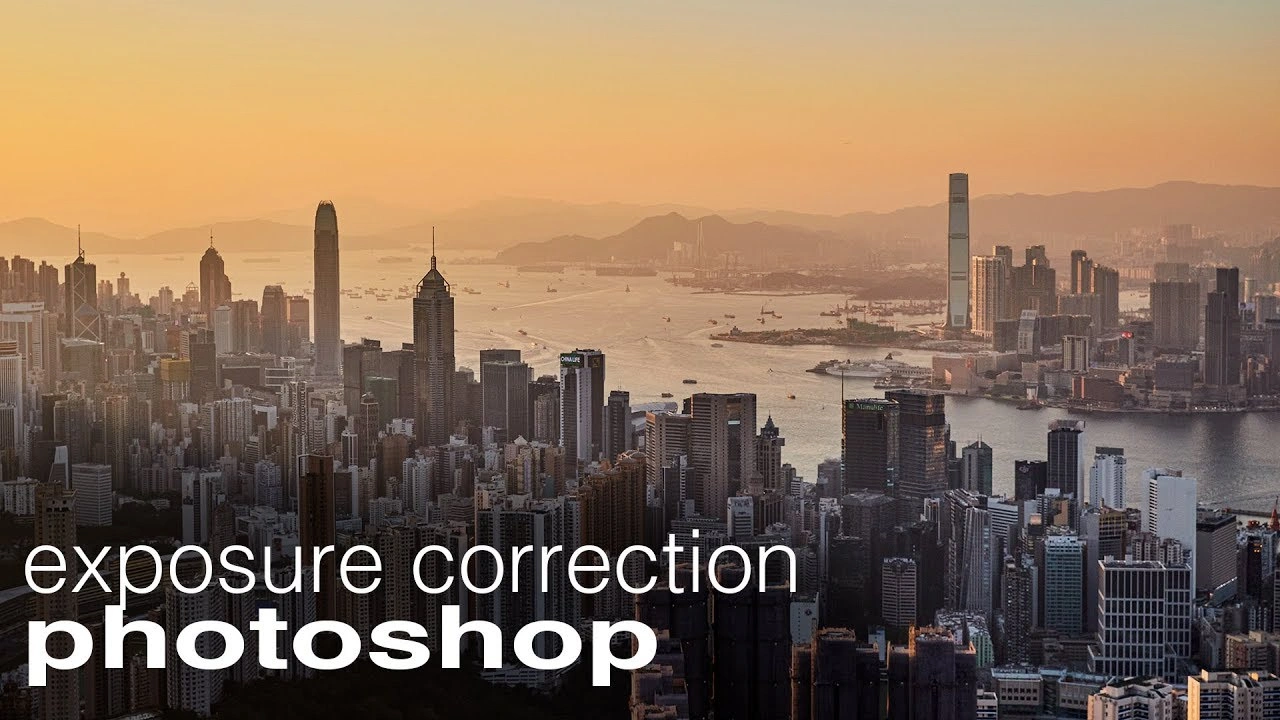
Color accuracy is very important for building customer trust. Start by adjusting white balance, highlights, and shadows to make sure the product colors look natural and consistent.
Fix any color issues caused by lighting or reflections, and ensure exposure is balanced across similar images—especially when products are shown side by side.
- Adjust white balance to correct color tones
- Balance highlights and shadows for even exposure
- Sync settings across similar images for consistency
A precise and consistent editing process reduces customer confusion, lowers return rates, and helps maintain a strong and reliable product photography workflow.
Retouching and Background Removal
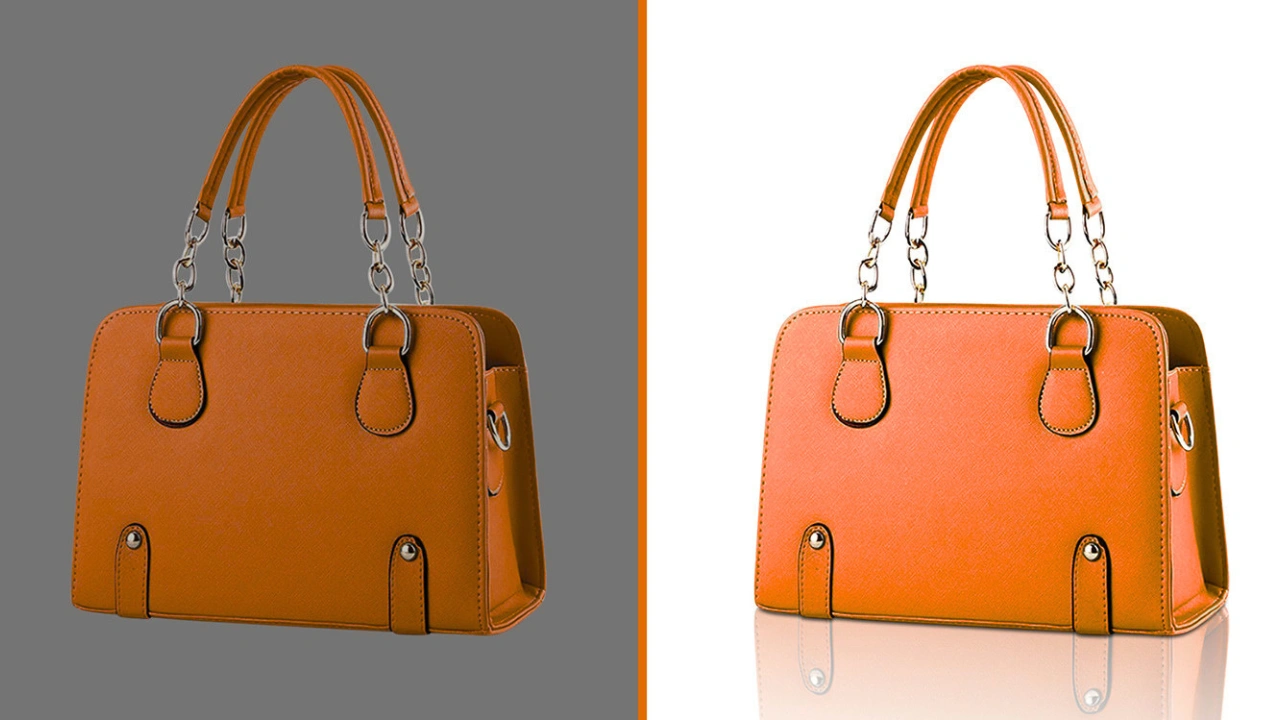
Retouching helps improve your images by removing imperfections and making the product look more polished and professional. It increases the overall value of the product in the eyes of customers. Start by cleaning up dust, scratches, and any small defects in the image.
You can use clipping paths or AI-based tools to remove backgrounds and create clean catalog images. This is especially useful for e-commerce platforms that require plain or consistent backgrounds.
Advanced retouching may include skin smoothing for model shots, focus stacking for detailed products like jewelry, or creative edits for marketing campaigns.
- Remove blemishes and unwanted elements
- Apply advanced retouching for key images
- Keep backgrounds pure white or aligned with brand style
Careful retouching is an important part of a professional product photography workflow, helping ensure high-quality and consistent results.
Optimizing for Web and Print
Optimizing images helps ensure they load quickly, look sharp, and work well across different platforms. For web use, resize and compress images using formats like JPEG, PNG, or WebP. This keeps file sizes small while maintaining good quality.
For print, export images at higher resolution and use CMYK color profiles when required to ensure accurate color output. Since different platforms have different needs, it’s important to create multiple versions of the same image.
Batch processing tools can save time when working with large numbers of images. A strong product photography workflow always includes proper optimization steps, helping improve SEO performance and increase conversions.
Quality Control and Final Review
Quality control is the last step in your product photography workflow. At this stage, review all images to ensure consistency in lighting, color, and overall branding. Check for any technical issues such as focus problems, exposure errors, or color differences.
Using a checklist helps confirm that every image meets client or project requirements. It’s also important to get final approval from stakeholders before delivering the images, so any issues can be fixed in advance.
- Review images for consistent branding
- Check technical quality (focus, exposure, color)
- Get final approval from clients or team members
A careful final review keeps your product photography workflow organized, efficient, and helps maintain a strong and professional brand image.
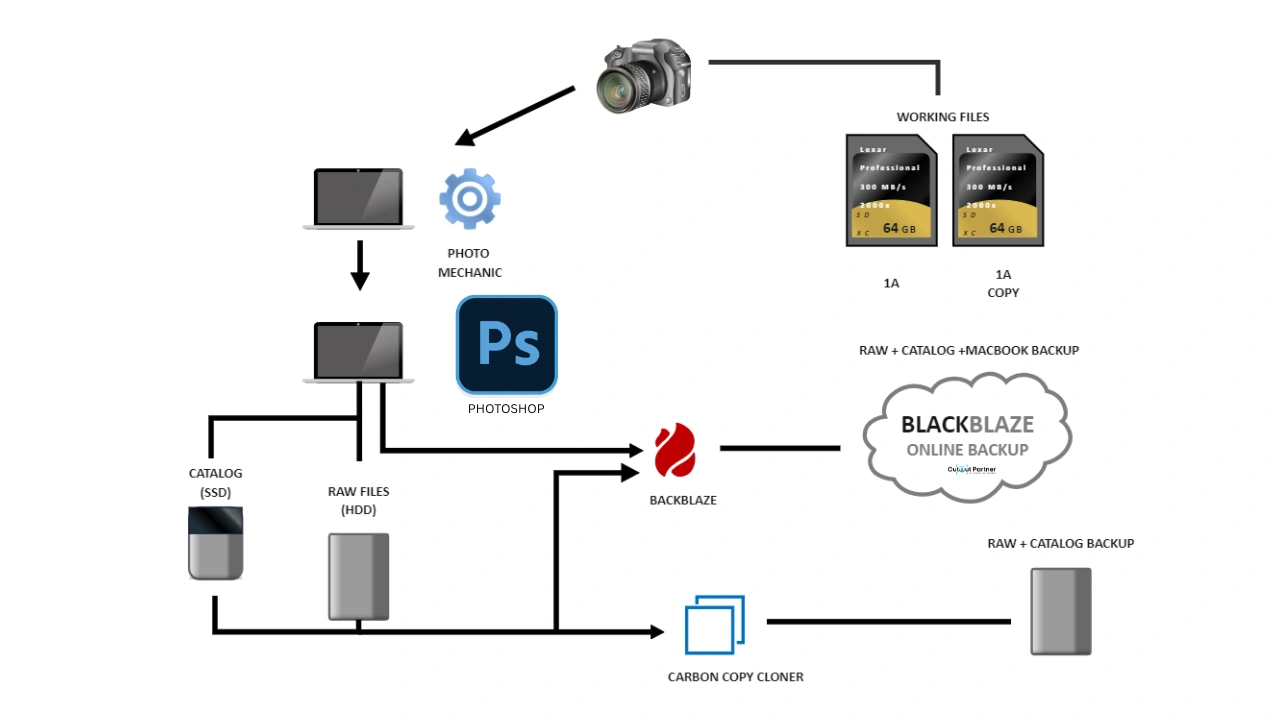
File Management, Delivery, and Asset Organization
Efficient file management is a key part of a successful product photography workflow. Without a proper system, even high-quality images can become difficult to find or manage. Let’s look at how brands organize, deliver, and store their visual assets for long-term use.
Organizing Digital Files Efficiently
A well-structured workflow starts with proper file organization. Create folders based on product name, shoot date, or platform so images are easy to locate. Use consistent file naming and add metadata to improve searchability.
Cloud storage is important for backup and remote access. Many teams now use automated tools that sort and tag images during import, saving time and reducing manual work. Organized files make future projects easier and prevent confusion.
Delivering Assets to Stakeholders
Once images are edited and approved, they should be exported in the required formats and sizes for each platform. Use cloud platforms or digital asset management (DAM) systems to share files securely with clients, teams, or developers.
Some agencies also use branded client portals to simplify access. Fast and organized delivery helps keep projects on schedule and builds trust with clients.
Archiving and Backing Up Projects
Proper backup and archiving are essential for long-term workflow success. Store files both locally and in the cloud to prevent data loss. When a project is complete, organize and archive it in clearly labeled folders or a DAM system.
Set access permissions to protect important assets and make sure only authorized users can access them. This makes it easy to reuse images for future campaigns or updates.
A strong file management system keeps your product photography workflow organized, secure, and ready for future use.
Workflow Automation and Asset Tracking
Modern product photography workflow depends heavily on automation to stay efficient. By using digital asset management (DAM) systems or project management tools, you can automate routine tasks such as tagging, resizing, and archiving images. AI tools can also detect duplicate files, manage versions, and notify you if any assets are missing.
Brands that handle large numbers of products (SKUs) benefit the most from automation. It helps reduce manual errors and saves a significant amount of time. This allows creative teams to focus more on shooting, editing, and improving image quality instead of handling repetitive tasks.
With the right tools in place, your product photography workflow becomes faster, more organized, and better prepared for future growth.
Adapting Your Workflow for New Technologies and Project Types
Staying competitive in product photography workflow means being open to new tools and evolving project needs. As technology changes quickly, your process should remain flexible while still keeping consistency in quality and branding.
Integrating AI and Automation Tools
AI is now an important part of modern product photography workflows. It helps speed up tasks like background removal, retouching, and basic edits. In some cases, AI can even create new variations of visuals from existing images, reducing the need for reshoots.
Some studios use AI-powered solutions to build visuals on top of clean product photos, helping them produce content faster while maintaining a consistent, brand-aligned look. This approach improves efficiency and supports scalable content creation across different platforms
Customizing Workflow for Different Product Categories
A single workflow does not fit every type of product. Different categories require different setups and processes in a product photography workflow. For example, apparel photography often uses ghost mannequins and consistent lighting, while jewelry photography needs macro lenses and careful control of reflections.
To improve results, create separate shot lists, equipment checklists, and editing presets for each product category. This helps highlight the unique features of each item. Since apparel, beauty, and home goods all have different requirements, adjusting your workflow for each category improves both efficiency and image quality. Tailored workflows help both small and large teams achieve more consistent and professional results.
Managing Remote and Hybrid Teams
Remote and hybrid work models are now common for creative teams. Collaboration tools make it easy to share files, review images, and approve edits in real time, no matter where team members are located. Cloud-based platforms for editing and asset management keep everyone connected and working smoothly.
For global teams, clear communication and well-defined roles are essential. Project management tools help track progress, assign tasks, and meet deadlines. Adapting your product photography workflow for remote environments improves flexibility while keeping teams aligned and accountable.
Preparing for Future Trends: 3D, AR, and Video
The future of product photography workflow is becoming more interactive and visual. Many brands now create assets for 3D modeling, AR experiences, and video along with standard photos. This includes planning for 360° views, interactive displays, and motion-based content during shoots.
Including these formats in your workflow gives your brand a competitive advantage and meets modern customer expectations. As 3D and interactive visuals become more common in e-commerce, adding these capabilities helps keep your content strategy future-ready and effective across multiple channels.
Conclusion
A well-structured product photography workflow is no longer optional—it is essential for success in today’s competitive e-commerce landscape. As highlighted throughout this guide, every stage plays a vital role, from careful pre-shoot planning and precise shooting techniques to detailed post-production, file organization, and final delivery. When each step is executed with consistency and attention to detail, the result is high-quality visuals that not only look professional but also build trust and drive conversions.
In 2026, advancements in AI, automation, and digital asset management are making workflows faster, smarter, and more scalable. Brands that adopt these technologies while maintaining strong creative standards gain a clear advantage. At the same time, customizing workflows for different product categories, managing remote teams efficiently, and preparing for emerging formats like 3D and AR ensure long-term adaptability.
Ultimately, success in product photography comes from combining structure with creativity. A streamlined workflow reduces errors, saves time, and improves collaboration, while consistent processes ensure every image aligns with your brand identity. Whether you are a solo creator or part of a large studio, refining your product photography workflow is the key to producing impactful visuals that capture attention, enhance user experience, and boost sales across all platforms.